Showing posts with label windows. Show all posts

Thursday, January 14, 2010

[TRK] Image in the background of your pendrive

Step:1 Copy this code into notepad (copy and paste), then save it as "desktop.ini"

Code:

[.ShellClassInfo]
IconFile=%SystemRoot%\system32\SHELL32.dll
IconIndex=127
ConfirmFileOp=0

[{BE098140-A513-11D0-A3A4-00C04FD706EC}]
Attributes=1
IconArea_Image="your_picture.jpg"
IconArea_Text="0xFFFFFF"
VeBRA sources - don't delete the tag above, it's there for XXXXX purposes -
[ExtShellFolderViews]
{BE098140-A513-11D0-A3A4-00C04FD706EC}={BE098140-A513-11D0-A3A4-00C04FD706EC}
{5984FFE0-28D4-11CF-AE66-08002B2E1262}={5984FFE0-28D4-11CF-AE66-08002B2E1262}

[{5984FFE0-28D4-11CF-AE66-08002B2E1262}]
PersistMoniker=Folder.htt
PersistMonikerPreview=%WebDir%\folder.bmp

Step:2 Put "desktop.ini" file onto your flash drive and replace "your_picture" with the
name of the picture you want to use, leaving the .jpg extention the same.

Step:3 Now copy the picture that you want to use onto your flash drive.

Step:4 Now Refresh (F5) ..and enjoy with new background...


Note: See that the image resolution is not more than that of your screen. Also you can make both files hidden so it looks bit clean.

Sunday, January 10, 2010

[TIP] Terminate full-screen games and appls when they stop responding

Actually it is pretty simple and doesn’t require any advance level of computer knowledge.
First you need to know what is the process name used by the game. Let’s take Counter Strike 1.6 as an example. You can check the process name for the game by right clicking the Counter-Strike 1.6 shortcut and select Properties.
Go to the Shortcut tab to view the Target. As you can see, Counter Strike 1.6 process is actually hl.exe.

Now you need to create a batch file that will kill the hl.exe process when you simultaneously hit a combination of shortcut keys. Open notepad, and type the command line shown below.
taskkill /IM hl.exe
Save the text file as anything.bat and not .txt
When you run the anything.bat file, it should be able to close the game.


Now we will assign a shortcut key to run the batch file.
Right click the anything.bat file and select “Create Shortcut”. A new file named “Shortcut to anything.bat” will appear. Right click at “Shortcut to anything.bat” file and select Properties. Click at the Shortcut Key blank area and type any key of your choice. 
If you type the letter “K”, it will automatically assign Ctrl + Alt + K as the shortcut key to run the killcss.bat file.
One very more important rule is that the shortcut must be placed at desktop for it to take effect.
When the game hangs in future, I just need to hit Ctrl + Alt + K key to kill the game so you can restart the game without having to restart your computer.

Thursday, January 7, 2010

[TRK] Convert partition from FAT to NTFS

In Windows XP, click Start, click Run, type cmd and then click OK. At the command prompt, type 
CONVERT [driveletter]: /FS:NTFS. 

Convert.exe will attempt to convert the partition to NTFS.
Note: Although the chance of corruption or data loss during the conversion from FAT to NTFS is minimal, it is best to perform a full backup of the data on the drive that it is to be converted prior to executing the convert command.

[TRK] Shutdown PC with Timer, no softwares req.


Well here are some ways in order to shutdown your PC with the help of a Timer.

METHOD 1
Do you know that you can make your PC shutdown at a time u wish to?
Here is the trick!
How To Make A Shutdown Timer!
Step 1:
Right click on your desktop and choose “New=>shortcuts“.
Step 2:
In the box that says “Type the location of the shortcut“,
type in “shutdown -s -t 3600” without the quotation marks and click next.
Note: 3600 are the amount of seconds before your computer shuts down. So , 60secs*60mins=3600secs.
Step 3:
Make up a name for the shortcut and you’re done.
You can change the icon by right clicking=>properities=>change icon=>browse.

To abort:
To make an abort key to stop the shutdown timer just create another shortcut and make
the “location of the shortcut” to “shutdown -a” without the quotes.
METHOD 2
Here is another trick to shutdown at a specific time, for example you wish to shutdown at 11:35am. Type this in
start=>Run
Type Code: at 11:35 shutdown -s

To abort
Code: shutdown -a
Note: all time are in 24hr, example u would like to shutdown at 8:30pm, you should type

at 20:30 shutdown -s” without quote
METHOD 3
you can use a batch for that as well it makes it easier to use
just run the batch and enter the time you want it to shutdown
shutdown.bat
Type Code:
@echo off
title Scheduled Shutdown Batch Example by chacha1234
color A
echo Enter Time To Shutdown (example 19:30)
set /p stime=
cls
at %stime% “”shutdown -s -t 00″” >nul
echo Your PC Will Auto Shutdown At %stime%
echo Press Any Key To Exit
pause >nul
exit
also you can add -c “desired message” at the end of the shutdown command
for example
shutdown -s -t 60 -c “Shutdown Pc”
using this command u can also schedule ur pc to restart
for example
shutdown -r -t 60 -c “Restarting Pc”

Sunday, January 3, 2010

[TRK] Changing the text on START button

You Need to Modify "Explorer.exe File" To make the changes you need to locate and edit the file "explorer.exe". It's located at C:Windows. The file "Explorer.exe" is a binary file, so you will need special editor. Resource Hacker aka Reshack will do. Resource Hacker is a good freeware utility to view, modify, rename, add, delete and extract resources in 32bit Windows executables and resource files.
First Backup "explorer.exe" located at C:\Windows\explorer. You can place it in a different folder or save it to a different drive. Now you can edit "explorer.exe".
Open Resource Hacker, in file menu click open and navigate to explorer.exe. The category will be using is String Table. You need to expand it by clicking on the plus sign, then navigate down and expand string 37 followed by 1033, (For Classic Layout use number 38). On the right hand pane look for item 578 it show the word "start" this is what we are going to modify.

To edit the word "start" you just double click on start so that it's highlighted, don't highlight the quotation marks on the sides of start. The new text go's in between the quotation marks, like this "new" remember don't delete the quotation marks. So that it looks like this "new"
Now that you have changed the start text you need to click on the Compile Script button. After you have clicked on the Compile Script button you need to use the Save As command on the File Menu to save the altered file and give it a name. A good file name "explorernew.exe" or make your own. Don't use the Save command use the Save As commaned! Save the newly named file to the C:\Windows. 
Now it's time to modify the registry so that your modified explorer.exe file that you created will be recognized when the user logs on your system. Go to the Start button (soon going to be something different), then go to Run and type regedit. Now Navigate download the list to "HKEY_LOCAL_MACHINE" click on the plus, to SOFTWARE, to Microsoft, to Windows NT, to CurrentVersion, to Winlogon. The full string: HKEY_LOCAL_MACHINE\ SOFTWARE\ Microsoft\ Windows NT\ CurrentVersion\ Winlogon
Look on the right pane for Shell, double click on Shell entry to open the Edit String dialog box. In the Value data: line enter the name that your used to save the modified explorer.exe file ie explorernew.exe . Then click on OK.
Now close Registry Editor and either restart or log off your system, and then log back on. Now if the computer gods are happy and all went as planned you should see the new Start button with your cool text on it.

[TIP] "No To All" instead of clicking no a hundred times

When moving files, Windows XP will give four options: Yes, Yes to All, No and Cancel. Sometimes though, you want a No to All — to enable this, just hold down SHIFT while clicking No.

[TIP] Save HDD space, improve computer's efficiency

Do it yourself without using any 3rd party software.......
It will not only save your harddisk space but also increase the efficiency of the computer.........

Create a file named filename.bat on any of your partition and write the following code in that file and then save. After saving run and enjoy the increased efficiency of your PC.
Note: Add/remove the name of partition as per your partitions number/name like d: or E: or F: etc.
---------------------
cd\
del/s *.tmp, *.bak
cd C:\Documents and Settings\Administrator\Local Settings\Temp
del *.*
cd C:\Documents and Settings\Administrator\Local Settings\Temporary Internet Files
del *.*
cd c:\windows\temp
del *.*
d:
del/s *.tmp, *.bak
e:
del/s *.tmp, *.bak
----------------------

Also if you wish you can add this filename.bat file to the startup of the computer/windows........

[TRK] Restarting Windows Without Restarting Your PC

A modern PC with Vista Home Edition takes about one and a half minutes to boot. An older machine with XP is about the same. That’s 30 seconds for the PC itself (the BIOS) to boot up, plus a minute for the Windows operating system to boot.

Sometimes, you need to reboot Windows (e.g. when installing new software), but there is no need to restart BIOS, too. However, the default is to reboot both. (That’s called doing a “cold boot,” rather than a “warm boot.”) There’s a trick that works on both XP and Vista to get it to do a warm boot instead, thus saving you 30 seconds per cycle.

The trick is to hold down the SHIFT key when invoking the restart.

Windows Vista: Select Start, then hover over the right arrow that is to the right of the padlock icon until the pop-up menu appears that contains “restart” as one of it’s choices. Hold down the SHIFT key while clicking on the “restart” choice.

Windows XP: Select Start. Select “Shut Down…”.
Change the drop-down combo box under “What do you want the computer to do?” to “Restart”. Hold down the SHIFT key while clicking on the “OK” button.
Or ... the alternate
Click on Restart, while holding the SHIFT key

[TIP] Lost your Motherboard Driver CD, here's something for ya'

Whenever I install Windows I have to search for my motherboard CD for installing drivers of sound, LAN, graphics, etc and majority of times it takes hell a lot of time to search for driver CD. At least I find it very difficult to keep my CD in a safe place so that I can use it when I need it.

But what will you do if motherboard driver CD gets lost, I know you will say that you'll go to Internet and download all the desired drivers from there but for that you should know the model number also. If you have lost your motherboard CD and do not know your motherboard model number and want to download or update your drivers, here is a very good application for you.

DriverMax
DriverMax is a tool that allows you to download the latest driver updates for your computer. No more searching for rare drivers on discs or on the web or inserting one installation CD after the other. Just create a free account, log in, and start downloading the updates that you need.
You can also export all your current drivers (or just the ones that work ok) to a folder or a compressed file. After reinstalling Windows you will have everything in one place!
Most of the situations when Windows is running slower are caused by faulty driver installations. Windows stores all versions of older drivers just in case you want to go back; sometimes it messes up older versions with more recent ones. The Export Wizard will only export the drivers you select by copying the needed files to a folder or a compressed ZIP file.

After reinstalling Windows all drivers will be back in place in less than 5 minutes - sparing you of searching, inserting disc after disk and losing precious time. The Import Drivers wizard allows you to install all the drivers that you exported earlier. The entire operation might take up to 5-10 minutes.

Just one single computer restart will be required after all drivers are reinstalled!

Download: http://small.drivermax.com/soft/dmx/drivermax.exe

Sunday, October 4, 2009

[TIP] Installing Windows XP OS in 10-12 mins

I found that we can bypass the 40 minutes of time while we are installing Windows XP.
Hope you will like it...

We all know that after loading the file or copying the file from the boot disk to temporary space the system requires a first time reboot.
Now if we PRESS SHIFT+F10 then the task manager will open
Goto the processes tab and search the process "setup.exe"
Right click on it, set priority, and set it to "Realtime"
 
We are done!!!
Find ur XP getting installed in 10min with tolerance 2 min.

Sunday, September 27, 2009

[TIP] Correcting System Hang at Startup

If your system hangs about 2 or 3 minutes at startup, where you can't access the Start button or the Taskbar, it may be due to one specific service (Background Intelligent Transfer) running in the background. Microsoft put out a patch for this but it didn't work for most. Here's what you need to do:

1. Click on Start -> Run, type 'msconfig', then click 'OK'.
2. Go to the 'Services' tab, find the 'Background Intelligent Transfer' service, disable it, apply the changes & reboot.

This problem with the Background Intelligent Transfer Service should have been corrected in Windows update Q 314862, part of Service Pack 1.

Sunday, September 20, 2009

[TIP] Make Windows Geniune


Have you ever faced problems while installing certain softwares like Internet Explorer 7/+, or Windows Media Player 11/+, may be because your copy of windows is not genuine

OK, here is a small trick to make your copy of windows genuine

Just copy the following code in notepad n save that notepad file as "anything.reg"
Now run that file n restart your pc
You are done !!!


Windows Registry Editor Version 5.00

[HKEY_LOCAL_MACHINE\SOFTWARE\Microsoft\Windows NT\CurrentVersion\WPAEvents]
"OOBETimer"=hex:ff,d5,71,d6,8b,6a,8d,6f,d5,33,93,fd
"LastWPAEventLogged"=hex:d5,07,05,00,06,00,07,00,0f,00,38,00,24,00,fd,02

[HKEY_LOCAL_MACHINE\SOFTWARE\Microsoft\Windows NT\CurrentVersion]
"CurrentBuild"="1.511.1 () (Obsolete data - do not use)"
"InstallDate"=dword:427cdd95
"ProductId"="69831-640-1780577-45389"
"DigitalProductId"=hex:a4,00,00,00,03,00,00,00,36,39,38,33,31,2d,36,34,30,2d,\
31,37,38,30,35,37,37,2d,34,35,33,38,39,00,5a,00,00,00,41,32,32,2d,30,30,30,\
30,31,00,00,00,00,00,00,00,00,0d,04,89,b2,15,1b,c4,ee,62,4f,e6,64,6f,01,00,\
00,00,00,00,27,ed,85,43,a2,20,01,00,00,00,00,00,00,00,00,00,00,00,00,00,00,\
00,00,00,00,00,00,00,00,00,00,00,31,34,35,30,34,00,00,00,00,00,00,00,ce,0e,\
00,00,12,42,15,a0,00,08,00,00,87,01,00,00,00,00,00,00,00,00,00,00,00,00,00,\
00,00,00,00,00,00,00,00,00,00,00,00,00,00,00,00,00,94,a2,b3,ac
"LicenseInfo"=hex:9e,bf,09,d0,3a,76,a5,27,bb,f2,da,88,58,ce,58,e9,05,6b,0b,82,\
c3,74,ab,42,0d,fb,ee,c3,ea,57,d0,9d,67,a5,3d,6e,42,0d,60,c0,1a,70,24,46,16,\
0a,0a,ce,0d,b8,27,4a,46,53,f3,17

[TIP] Remove Windows Genuine Validation Notification


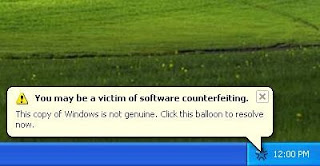
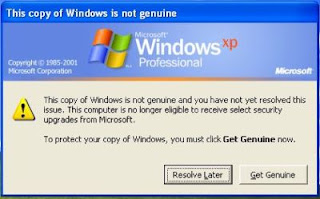
If your copy of windows is not genuine, and you happen to visit microsoft.com or install the automatic update - WGA Validation Tool (KB892130) and WGA Notifications (KB905474), then windows gives a nag screen on start up, and also gives random pop-up balloons. To make things worse, it removes your wallpapers, etc.
You have 30 days after this notification starts and after that you may have to re-install windows, if you do not fix it

OK, here are a few ways to fix that problem.

Method 1:
Step 1) Download RemoveWGA.exe tool and run it.
Step 2) It tell you if the WGA notification tool is active on your system
Step 3) Allows you to remove the WGA notification tool from your system
note-If the above download link doesnt work, you may also find the tool on softpedia.com click here

Method 2:
This ones a little tricky,but i like it, and prefer doing it this way
Step 1) Launch Windows Task Manager
Step 2) Go to Processes and look for wgatray.exe, select it and click on end process
Step 3) It will ask for confirmation, don't click on anything, wait
Here's the tricky part of it
Step 4) Now open C:\Windows\System32 and look for WgaTray.exe, select it, and then delete it.
Step 5) It will ask for confirmation to delete, wait
Step 6) Now align that end process confirmation box over the delete confirmation box.
Step 7) Click Yes on end process and then quickly press Yes on the deletion confirmation.
(You need to repeat this if you miss it)
Step 8) Lauch RegEdit(Start=>Run=>regedit)
Step 9) Browse to the following location: HKEY_LOCAL_MACHINE\SOFTWARE\Microsoft\Windows NT\CurrentVersion\Winlogon\Notify
Step 10) Delete the folder WgaLogon and all its contents
Step 11) Reboot Windows xp


That's it, you are done with it!